Iklan

Showing posts with label Gardening. Show all posts

How to Cultivate California Papaya


How to Cultivate California Papaya. The California variety of papaya plant is one type of papaya that is currently popular and is currently being planted by many farmers because it is very promising for its benefits. California papaya has become more popular over time. Many farmers and gardeners grow California papaya varieties on a large scale.

The California Papaya plant has seeds with small, oval-shaped grains. If sown, the leaves are light green and under 7 months old, there are pigtails or antennae that rise short at the tips of the leaves. The height of the papaya tree is relatively dwarf, 1.5 – 2 m with short stems and fronds.

This is closely related to the increasing market demand for California papaya. Consumers seem to prefer papaya from America. The thick flesh, sweet taste, and longer shelf life are some of the reasons why California papaya is in great demand.

read too : How to Plant Strawberries Hydroponically

Farmers and gardeners choose this variety for several reasons, including the high productivity and fast fruiting (dwarf) of the California papaya. Another reason is its tolerance to climate and weather. The California papaya variety can also be planted and grows optimally anywhere, including on peatlands.

This type of papaya does not have specific growing requirements because this variety can grow optimally in lowland, central and mountainous areas. California papaya can be cultivated at any time, both in the rainy season and the dry season. Good soil for growing California papaya is loose, slightly sandy, and rich in humus. This variety is best grown in well-drained soil that is not waterlogged or muddy. The ideal pH for California papaya is between 6.0 and 7.0 (neutral) and requires full sun.

Techniques for Planting California Type Papaya

1. How to Prepare and Sow California Papaya Seeds

It is best to use quality seeds that have been tested for satisfactory results. California papaya reproduces by seed (generatively). Seeds can be found in farm stores, with many brands of California papaya seeds currently on the market. Seeds are sown first in polybags with a minimum diameter of 10 cm. The plant substrate is a mixture of soil, bark, charcoal, compost/fertilizer in a ratio of 3:2:1. Mix all the ingredients until evenly mixed, then put it in an open place away from rain and direct sunlight. After 7 or 10 days, put the planting medium in a polybag and the California papaya seeds are ready to be planted. Seedlings can be planted at the age of 1 or 1.5 months.

2. Preparing California Papaya Land

How to Cultivate California Papaya - The land is first cleaned of weeds, wood roots and previous plant remains. The land is then plowed or weeded. Sprinkle dolomite lime if the soil pH is below 6.0. Arrange drainage by making beds or ditches. The bed is made with a width of 1.5-2 meters, the height and length are adjusted to the conditions of the country. The distance between beds is 80-100 cm. Ditches and benches are made with the aim of facilitating irrigation in the dry season and preventing the soil from pooling in the rainy season.

3. Sowing California Papaya Seeds

Before sowing the seeds, make a planting hole in the bed. The planting hole is made with dimensions of 30 cm x 30 cm x 30 cm (modified to suit the size of the polybag). The planting holes in the bed are 2.5-3 meters apart, then sprinkle dolomite lime in the planting holes if the pH is below 6.0. Allow about 2 weeks before sowing the seeds. Then prepare a mixture of soil and fertilizer with a 1:1 composition, put it in a place protected from rain for 2-3 weeks. This soil is useful for collecting planted seeds and acts as basic fertilizer.

Once the holes are drilled and all the above preparations are made, it's time to plant the California papaya seeds in the field. Use healthy, disease-free seeds. Open the polybag carefully so that the planting medium does not break, then plant the seeds in the planting hole. one seed one hole. Fill the planting hole with the prepared mixture of soil and fertilizer. Press a little to harden so that the seeds don't crumble easily and dry out. Planting should be done in the afternoon. After planting, wash with plenty of water (if the soil is dry). Check plants regularly after planting. Prune as soon as the plant dies or is disturbed by pests. Sutures can be performed up to 3 weeks of age or up to 1 month after implantation.

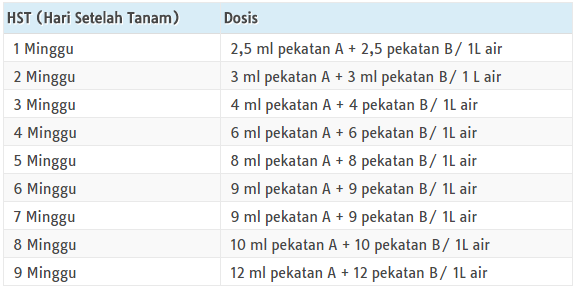
4. How to Fertilize California Papaya Monitoring and Types of Fertilizer Used by California Papaya Plants

Must receive additional fertilizer for good growth. Fertilizer is given at least once every 3 months. After fertilization, it is given as fertilizer up to 10-15 kg per tree. NPK fertilizer can also be added at a dose of 100-150 kg for one growing season. The manure used must be mature or old manure. The fertilizer was distributed to me

How to Plant Chicken Hydroponics Easily

How to Plant Chicken Hydroponics Easily

How to Plant Chicken Hydroponics With Easy - Hieroponic planting techniques are actually being broadly favored due to the fact the planting device uses water media, making it more green location and outcomes obtained extra abundantly. In addition, by way of the use of this method the plant can take in more nutrients optimally.

In addition this approach is also very appropriate for fanatics of busy flowers and have little time to take care of the plants because with this method you do not need watering at any time. Usually this technique is widely carried out by using the lovers of vegetation that live in urban regions. For novices usually begin via planting simple leaf vegetables, one example is chili. Here are a few ways to get chili with hydroponics .

How to Plant Chicken Hydroponics Easily
  • The first stage for planting hydroponic chillies is through sowing chili seeds that may be discovered within the chillies on your kitchen. Choose a very good chilli, old and now not unwell. Take the seeds and at once planted on the media seedlings within the form of a combination of soil, compost and charcoal husk with a ratio of 1: 1: 1.
  • Spread chilli seeds on the seed medium with a distance of 3 × three cm and cover via the usage of the floor in haluss above it. Spray seedlings by using water and wait 5-7 days hingg after seeding till the seeds start to germinate.


  • The next step is to put together the planting media of hydroponic chilli. Media planting hydroponic chilli can use a combination of husk charcoal and cocopeat (coconut powder) with a ratio of 1: 1 and blend it flat. Also put together flannel cloth for nutrient absorption media to the plant.
  • Next is to put together a planting place that can be a dietary tank and pots that you may get at the gadgets that are around you. To prepare a reservoir and pots, you can see the subsequent scheme
  • After planting media and region of planting were organized chilli seedlings may be moved into the planting medium whilst the seedlings had been aged 25-30 days after seeding. Try while the technique of elimination of root seeds isn't interrupted. In order to greater without problems pass it by way of manner of flushing the media then seeded then gouged with the media.
  • Wash seedlings from seedling media the usage of clean water and do it carefully. After washing you could plant into a pot that has been organized and flush with sufficient water.
  • Place the flowers in the color and do not allow the planting medium to dry. Put on the place for five-7 days and then you can placed the chili flowers in a place that is exposed to direct sunlight.
  • The nutrients used for hydroponic chillies are the AB Mix nutrients created specially for plants grown with hydroponics strategies . For the doses used for hydroponic chilli, you could pay attention to the following table.
  • In addition to meeting the provision of nutrients, the shape of maintenance of hydroponic chili plant life is likewise a form of pest and disease control. You can commit even decrease the dietary solution if the nutrients begin to decrease or excess. Try no longer to dry the plant life or maybe run out of nutrients.
  • Pests that usually assault hydroponic chili flora consist of mites, aphids, thrips, caterpillars, antrakosa, fruit rot, leaf spot and so forth. For the coping with you could do the disposal or destruction of the infected plant element.
  • But if the pest has attacked your hydroponic chilli plant to intense then you ought to put off and burn the pepper plant life which might be attacked by using pests, so as no longer to spread to different flora.
  • Spray the vegetation with leaf fertilizer every one week as this could meet the desires of micro nutrients during the vegetative increase. When hydroponic flora enter the generative length, spray with fruit fertilizer, you could use A / B gandasil, Growmore, Bayfoan, POC Nasa or supergrow.
  • You can harvest the hydroponic chillies whilst the age of the chillies is eighty-ninety days after planting.

Thus the tiers of planting hydroponic chilli easily. You can do it your self at home or do it on your chilli cultivation. Do no longer forget about to usually read other gardening articles just here . Happy gardening and hopefully can be useful.


How to Plant Longevan in Home

kelengkeng

How to Plant Longevan at Home Home - Longan is a form of fruit that has the content material resembles rambutan and skin resembles duku pores and skin. In Indonesia by myself this biuah has many types. This fruit is bought inside the marketplace at an low cost rate and may be purchased by various circles.

The fruit of this kelengkeng has many enthusiasts due to its distinctive and sweet flavor. In its improvement is now a tree kelengkeng also can be planted in pots. Sentra and distribution of farm kelengkeng already extensively unfold throughout Indonesia, Asia and some international locations in Africa, Europe and America. The primary techniques of planting plants kelengkeng range.

Cultivation of kelengkeng within the yard or in the front of the house is the pleasant desire, because the cultivation of crops isn't always too high-priced, and the method of cultivation is realistic, efficient, reasonably-priced and may reach anybody who live inside the town or village.

Plant kelengkeng has been evolved either generatively (seed) or thru vegetative way. Each of these techniques has its very own advantages. You can decide what approach you will use to plant the plants in front of the residence.

In addition to the everyday flavor and scrumptious, fruit kelengkeng turns out to have many fitness blessings. Here are the advantages of culmination to fitness klengkeng :
  • Anti-depressant, longan fruit has vitamin content material which can loosen up the nervous machine and is capable of lessen the potential for despair.
  • Streamlining the blood flow in the frame if fed on often.
  • Ward off unfastened radicals, so can avoid most cancers.
  • Maintain immunity due to vitamin C content material in fruit kelengkeng.
That is the advantages of fruit kelengkeng for health. If you need to grow fruit crops in the front of your house, right here are the stairs to plant fruit plants in the front of the house.


How to Plant Longevan in Home
  • The first stage that must be completed earlier than beginning to plant longan is to prepare seedlings that may be received through planting seeds, grafting, grafting or cuttings. You can also purchase seedlings at your subscription shop and choose the type of lenght you want to plant.

  • The subsequent degree is the cultivation of plantation location that may be finished by means of embracing and creating a square-formed planting hole with the length x width x peak a hundred x a hundred x 40 cm with a distance of 2-three meters or you can modify the wishes of the land that will be in use.
  • Add the manure from the cattle dung as a whole lot as five-10 kg for each planting hollow into the planting hollow that has been excavated. Wait some days until the planting land can be planted seeds kelengkeng.
  • Treatment of the longan tree itself does now not require complicated remedy, the remedy is to clean the grass or shrub that grows close by and do the fertilization once more after the 30 12 months old kelengkeng after planting and might be better fertilization performed with manure. In addition you may also use the type of inorganic fertilizer NPK given at some point of the first year.
  • Watering the lengthy tree can be completed 2 instances an afternoon for the duration of the morning and afternoon in its infancy.
  • In addition to fertilizer software on the plant kelengkeng, pruning is likewise required for the tree kelengkeng too high. Pruning can be executed at the sixth, 9th, twelfth and next pruning consistent with the situation of the tree. The greater branches then the fruit out also increasingly more.

  • Harvest fruit harvest sports must be finished according with the level of fruit fruit maturity due to the fact in a single tree isn't cooked concurrently. Harvesting of mature fruits is accomplished as wanted.
  • In the early harvest, commonly the fruit of the transplant isn't always an excessive amount of, the range of 20-50 portions of planting, but in the next harvest will keep growing even doubled, and so on. Early harvest of fruit kelengkeng usually takes place at the time of the 1 yr vintage vegetation with quite a few fruit.
  • How to harvest the fruit kelengkeng is by picking the fruit of kelengkeng that has been cooked in the tree directly and then the fruit that has been harvested cleaned using clean water and dry.
Thus the degrees of planting a longan in the front of the residence. You can do it yourself at domestic. Do not forget to usually study different gardening articles just here . Happy gardening and optimistically may be beneficial.


How to Plant Durian To Be Fruitful Fast

durian


How to Plant Durian To Be Fruitful Fast - Who does not understand durian fruit? Taste is extraordinary and delicious to make this fruit has many fanatics. Because it isn't always sudden that many farmers are searching out approaches to plant durian to quick endure fruit. The fruit can grow at an altitude under 800 meters above sea stage with a pH of approximately five-7. Here is how to plant a durian to fast undergo fruit.

How to Plant Durian To Be Fruitful Fast
  • The first level is the seedling of durian seeds, properly durian seeds can be seen from the seeds are nonetheless intact and come from healthy breeding and not sick.
  • Clean the durian seeds from the final durian meat that is nevertheless connected and wind-aired. After cleaning the stage berikunta is nursery seed durian performed for two weeks. Nursery durian seedlings need to be done in a dry vicinity.
  • For medium durian seedbed seeds can use a aggregate of soil and sand with a ratio of 1: 1. Plant bii with a sloping role so that the basis candidate can move without delay to the floor. Do no longer forget to do watering once an afternoon.

semai biji durian
  • Cover the top to be covered from direct sunlight. Usually seeds will begin to grow whilst it's miles three weeks after the seedbed. This seed may be planted while it has leaves about 3-5 pieces.
  • After growing the leaves, then the seeds of durian can be planted. Planting media used must be wiped clean earlier than use. Create a badge as a drain whilst rain comes, so the rain water does no longer stagnate.
  • But you can additionally spray Basamid as an effort to avoid the soil from fungi which could assault the durian tree at some point of its increase.


  • After making the badengan, make a hole to move the seed durian with a distance of approximately 10-12 m. Enter the seeds of the seedlings which have been sowed and close once more with dry straw, preserve the durian flora with a day by day routine.
  • Make drainage streams for walking water. In newly planted seeds you have to flush as soon as an afternoon habitual. While in plant life that have been more than 1 month antique, you can water handiest 2-three times a week.
  • The next step is thinning which is meant to attain the fruit of durian with scrumptious flavor and to save you the durian tree from demise due to the fact the amount of fertilized plants may be very lots.
  • This technique is achieved by way of spraying Auxin A to show off the unfertilized plants, even as the fertilized vegetation will keep growing into durian fruit.
  • Pruning is likewise needed to inhibit the sudden boom of vegetative seedlings. Pruning may be achieved when the early days of the flowering timber for max durian harvest .
memetik durian
  • Do weeding of durian plants which you planted so that wild flowers across the durian tree does now not disrupt the increase of durian tree vegetation. Give also compost fertilizer, green manure or different synthetic fertilizers which include NPK two hundred gr for every tree. After three months durian planting period do regular fertilization with this NPK fertilizer each 4 months.
  • Durian tree is likewise similar to different vegetation that can be attacked by using pests. Therefore you could use Hostathion forty EC as its manage. Use pesticides and pesticides suitable to their respective features to manipulate them.
  • Durian bushes will usually flower on the age of eight years. You also should remember the fact that durian tree does now not always develop on every occasion, durian fruit will simplest bear fruit for the duration of the dry season best.
  • Ripe durian fruit produces a stinging scent and will alternate the colour of his skin. The ripe durian fruit will commonly fall on its very own to the ground, however it could make the durian fruit end up broken and its selling price will become decreased. Therefore you could tie the durian with a rope and plastic one month earlier than the durian is cooked.

So a way to plant durian to be fruitful . You can practice it your self or do it to your durian cultivation with the intention to be capable of endure fruit fast. Do not forget to study other gardening articles just at the facet . Congratulations to plant durian and with a bit of luck may be beneficial.